
TopJoy SPC Flooring Installation Guide
Introduction
This guide will take you through the necessary steps to install your TopJoy SPC Flooring. Make sure to carefully read through this guide so that you may know the best way to prepare for the installation. Failure to follow the instructions given in these guides, as well as improper installa- tion, will void the warranty given by TopJoy Flooring. If you have any questions regarding this guide, or have any questions not covered in these documents; please contact TopJoy Floors at: sales@topjoyflooring.com.
CAUTION: SAW DUST
The sawing, sanding, and/or machining of SPC products can produce dust particles that can cause respiratory, eye, and skin irritations. Machining power tools should be equipped with a dust collector to reduce airborne dust. Wear an appropriate NIOSH designated dust mask to reduce exposure to airborne dust particles. Avoid contact with eyes and skin by using proper safety glasses and protective clothing. In case of irritation, flush eyes or skin with water for at least 15 minutes.
Work Practices for Removal of Existent Resilient Floor Coverings!
Do not sand, dry sweep, dry scrape, drill, saw, bead-blast or mechanically chip or pulverize existing resilient flooring, backing, lining felt or asphaltic “cutback” adhesive. These prod- ucts may contain asbestos Fibers or crystalline silica. Avoid creating dust. Inhalation of such dust is a cancer and respiratory tract hazard. Smoking by individuals exposed to asbestos Fibers greatly increases the risk of serious bodily harm. Unless positively certain that the product is a non-asbestos containing material, you must presume it contains asbestos. Regulations may require that the material be tested to determine asbestos con- tent.
It is up to the homeowner and/or installer to ensure the correct type, model, collection, and color were delivered to the jobsite prior to installation. The homeowner/installer can do so by compar- ing it with the “sample” that the floor was selected from, ensuring the floor received is the desired floor and is acceptable for installation. It is the homeowners/installers responsibility to inspect the product for any visible defects or damages prior to installation. If the floor does not meet the homeowners/installers expectations and/or is not acceptable for installation; please contact TopJoy before beginning installation! The TopJoy Flooring Warranty does not cover any claims related to incorrect type, model, collection, color, visible defects or damages once the floor was installed. No replacement or refunds will be offered or issued once floor is installed!
1. Defect & Irregular Tolerance
TopJoy SPC flooring is manufactured in accordance with accepted industry standards, which permit manufacturing, grading and natural deficiencies to not exceed 5%. If more than 5% of the material is unusable, do not install the flooring. Immediately contact the retailer from which the flooring was purchased. No claim will be accepted for materials with visible defects once the floor was installed. Installation of any material serves as acceptance of the material.
2. Calculating & Ordering
When calculating square-footage and ordering SPC flooring please conceder adding at least 10%-15% for cutting & waste. SPC flooring like any other wood flooring must be cut to fit around obstacles such as but not limited to: Stair-cases, wall contours, pipes, and other household items.
3. Shipping, Handling & Storage
Make sure to store SPC flooring in an enclosed building that is well ventilated. When storing the SPC flooring:
● The floor boxes make sure to leave adequate room around the stacked boxes to allow air circulation. Do not store SPC flooring cartons near heating, cooling ducts or direct sunlight.
● Do not deliver flooring to the jobsite or install flooring planks until appropriate temperature and humidity conditions have been achieved. Appropriate temperature and humidity conditions are defined as those conditions to be experienced in the building after occupancy.
4. Acclimation
Even though TopJoy SPC Flooring products do not contain any wood particles they are still required to be acclimated so the newly manufactured flooring planks can adjust to the new environment and slowly reach the same setting as living conditions, which directly coincides with a relative humidity range of 30%-50%, and within a temperature ranging from 13C° to 38C°. These conditions are usually the normal living conditions of any normal household.
Therefore, it is recommended to acclimate TopJoy SPC flooring for at least 1-2 days.
5. Job Site Conditions
It is the sole responsibility of the homeowner/installer to determine if the job site conditions, environment, and installation surface (Sub-Floor) are acceptable for TopJoy SPC flooring installation as well as meet or exceed the EN or ASTM industry standards and regulations. Please make sure to evaluate the job site for potential problems before wood flooring is deliv- ered and installation begins.
PLEASE NOTE: TopJoy Floors warranty does not cover any failures resulting from, or related to, job-site environment/condition or sub flooring deficiencies.
The Homeowner/Installer must make sure of the following prior to installing the floor:
● Homeowner/Installer must ensure that the building is structurally complete and sound.
● Homeowner/Installer must ensure appropriate/consistent temperature and humidity condi- tions have been achieved. Appropriate temperature and humidity conditions are those that replicate conditions to be experienced in the building once occupied
● Insure that moisture and humidity test have been performed prior to shipping flooring to the job site.
● Ensure proper drainage exists around the structure.
6. Installation Surface & Sub-Floors
TopJoy SPC Flooring is considered a “floating” floor and is installed using a click floor system. This allows TopJoy SPC floor to be installed over most hard surfaces such as:
● Ceramic tile ● Slate ● Concrete slab ● Existing wood or laminate floor ● Cork Ceramic
Sub-Floor Requirements: The homeowner and/or installer must make sure
● Safe & Sound - That the sub-floor is properly fastened, structurally supported, and meets or exceeds all applicable local building codes & regulations as well as the NWFA (National Wood Flooring Association) guidelines.
● Clean & Dry -The homeowner and/or installer must make sure that the installation surface (sub-Floor) is clean, dry and free of any debris such as nails, wax, oil or any adhesive residue.
● Flatness - Installation Surface / Sub-Floor Must be flat to a tolerance of 3/16” per 10’ radius (4.76mm, in a 3.05m.) and the surface slope must not exceed 1" in 6' (2.54 cm in 1.83 m). If installation surface (Sub-Floor) does not meet the requirements stated below necessary steps must be taken to correct the problem.
● Soft Installation Surfaces / Sub-Floors - Soft Sub-Floors such as carpet or padding must be removed prior to installation
● Nail or Glue - Do not nail or glue flooring to the subfloor at any point, unless a glue-down and or nail-down application is desired.
7. Prerequisites
● Pull Bar ● Hammer ● Tapping Block ● Drill ● NIOSH-Designated Dust Mask ● Spacers ● Saw ● Touch-Up Kit/Filler Kit ● Carpenter’s Square ● Utility Knife ● Tape Measure ● Painters Tape ● Safety Glasses
Suggested Underlayment
● TopJoy High Density Foam (LVT Underlayment) – 1.5mm thickness.
Suggested Transition Pieces
● T-Molding
● End-Cap
● Reducer
● Quarter-Round
● Flush Stair Nose
8. Preparing for Installation
Trim Pieces & Door Casings - Prep the installation by removing any existing baseboards trims and transitions moldings. Undercut all door casings at the height of the new floor so it will fit underneath (Remember to allow a gap for expansion).
Plank Direction - Lay down planks to determine in which direction the panels will be laid. As a general rule, the floor should be laid parallel to the longest wall. This will create an aesthetical- ly pleasing look.
Inspect Planks - Inspect each plank for imperfections and damage as well as remove any manufacturing residues from the clicking channel before installing or cutting.
Expansion Gap - An expansion gap of 1/2” to 5/16” must be provided at all walls and fixed vertical surfaces to allow for expansion.
Layout - Measure the area of the room to get an idea for a “balanced” layout. The width of the first row of planks at the starting wall should be approximately the same width as the last row on the finishing wall. This can be adjusted by rip cutting the panels. The starting or finishing rows should not be less than 2" in width. Or half the plank (whichever is greater)
9. GENERAL INFORMATION
● Best installation practice recommends that the product be installed between 55°F (13°C) and 100°F (38°C).
● SPC flooring can be installed up to 50’ x 50’ (15.2 m X 15.2 m) or total of 2500 sq. ft. (232.3 sq m) with a 1/4” (6.4mm) expansion. Larger areas must provide a 5/8” (16mm) expansion up to 100’ x 100’ (30.4 m X 30.4 m).
● All subfloor/underlayment patching must be done with a non-shrinking, water resistant, high quality cement patching compound.
● All subfloors should be flat to within 3/16” (4.8 mm) in 10’ (3048 mm) and 1/32” (0.8mm) in 12” (305 mm).
DIAGRAM OF SPC INSTALLATION
UNICLIC® INSTALLATION INSTRUCTIONS
Method A ( Angle-In installation method): Position the panel to be installed at an angle of 20 to 30° to the panel already installed. Move the panel gently up and down while exerting forward pres- sure. The panels will automatically click into place. You can either insert the tongue into the groove, or the groove on to the tongue. The tongue into the groove is the easiest method.
(See diagrams 1A—1B —1C.)

Method B (Flat Installation method ): With Uniclic® you can also tap the panels into each other without lifting. For this method you must use the special Uniclic® tapping block. The planks should not be joined with a single tap and the tapping block should be sitting flat on the floor. To avoid damaging the panels you must tap them together gradually. (See diagrams 2A—2B.) Use this method only in cases where you are unable to use the Angle-In method ( see below).The rest of your floor should be installed using the Angle-In method.

UNICLIC® INSTALLATION INSTRUCTIONS
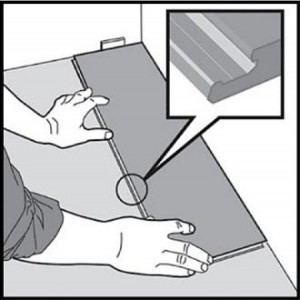
Fig 1. First plank, first row. Place a spacer of 3/8” thickness to the left and position the plank against the wall. Later, after 3 rows, you can easily position the flooring against the front wall with distances ≈ 3/8”
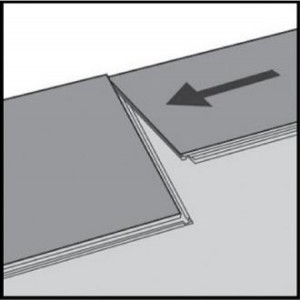
Fig 1. First plank, first row. Place a spacer of 3/8” thickness to the left and position the plank against the wall. Later, after 3 rows, you can easily position the flooring against the front wall with distances ≈ 3/8”
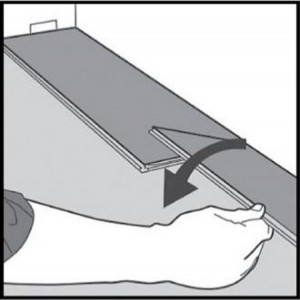
Fig 3. Fold the panel down in a single action movement, making sure the panels are tight against each other. Afterwards slightly tap down at the short end just installed till it clicks.
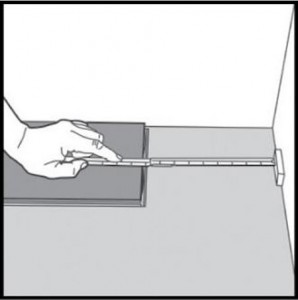
Fig 4. At the end of the first row, put a spacer 3/8” to the wall and measure the length of the last plank to fit.
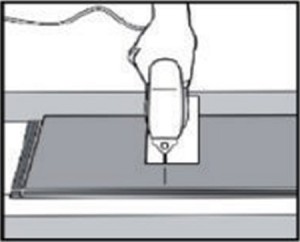
Fig 5. To cut the plank, use a simple utility knife and ruler, and with the topside facing up, cut heavily on the same axis. The knife will not go through the surface but make a deep cut. The plank will split naturally. Then, install it as previous plank.
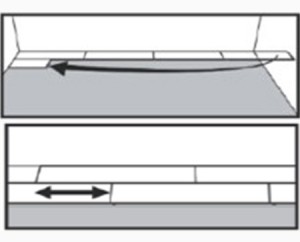
Fig 6. Start the second row with the leftover cut part of the last plank. This small plank should be a min length of 10”. Otherwise, a new starter piece should be used. Insert the plank at an angle into the previous row and tap (on the long side) it in using a tapping block till flat.
Fig 7. Minimum distance between short ends of planks in parallel rows should not be less than 6”.
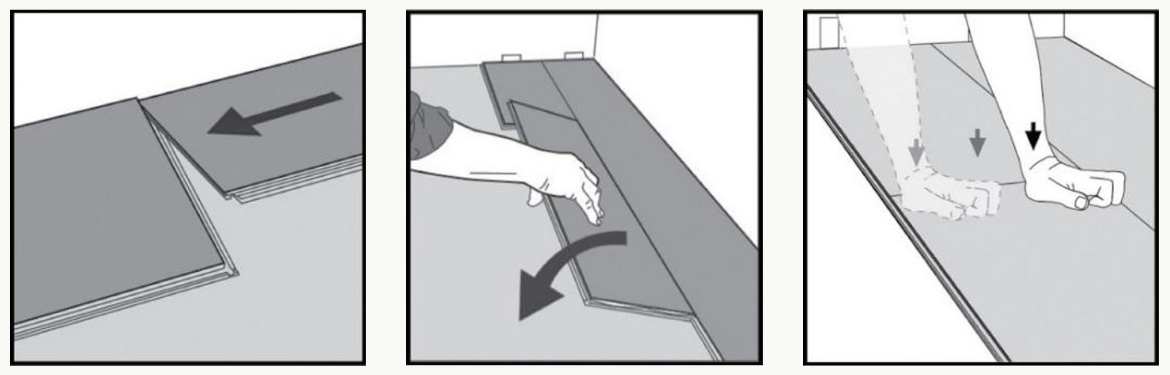
Fig 8. Second plank, second row. Place the panel at an angle into the groove of the previous row making sure that the end is tight to the previous panel. Then fold the panel down in a single action movement to the leftof the previous panel. Tap with the tapping block to make panels tight against each other.As the board flattens itself to the floor, gently tap the top of the short end with a rubber mallet until it is locked.
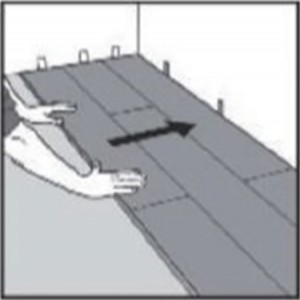
Fig 9. After 2-3 rows, adjust the distance to the front wall by placing spacers 3/8” on the side walls and the end wall. Once the adjustment is done against the main wall, continue to install till the last row

Fig 10. Last row (and perhaps also first row). The Minimum width of the last plank should be NOT LESS than 2” wide. Remember distance to wall is 3/8”. Tip! Put a spacer before measuring.
10. Moldings & Trims
Once all planks are installed, and any adhesive is cured, remove spacers and install appropriate trims and moldings in applicable places. When installing baseboards or wall-base make sure that the transition piece doesn’t press against the floor therefore allowing it to move freely.
Repairs
Always inspect panels before installation; however, if damage occurs during installation, the following repair procedures may be used: If a panel is slightly damaged or chipped, fill the void with a color matched filler.
If a panel is severely damaged and must be replaced the flooring will need to be disassembled back to the damaged planks. Determine the shortest distance from a sidewall and remove the molding. Lift the planks a few inches and tap along the joint. Remove the entire row back to the damaged area. Replace the damaged plank and reassemble the flooring.
Email: info@topjoyflooring.com
Mobile phone: (+86)18321907513
Tel: (+86)21-39982788/ (+86)21-39982799
Add: Unit 603 Building 7, Lane 2449, Jinhai RD,
Pudong New Area, Shanghai, 201209, P.R.China.